14 minutes
My Home Network
Background
I’m sure this is a familiar story to many people who work in the field. I took my first job as an IT Infrastructure Engineer in 2014. I was keen to learn so I invested some of my own time and money acquiring relevant skills and experience at home. This lead to the build of my first “home server” and shortly after, a second “backup server”.
With some apologies for the picture, here are my two servers as they looked in late 2014 and early 2015:
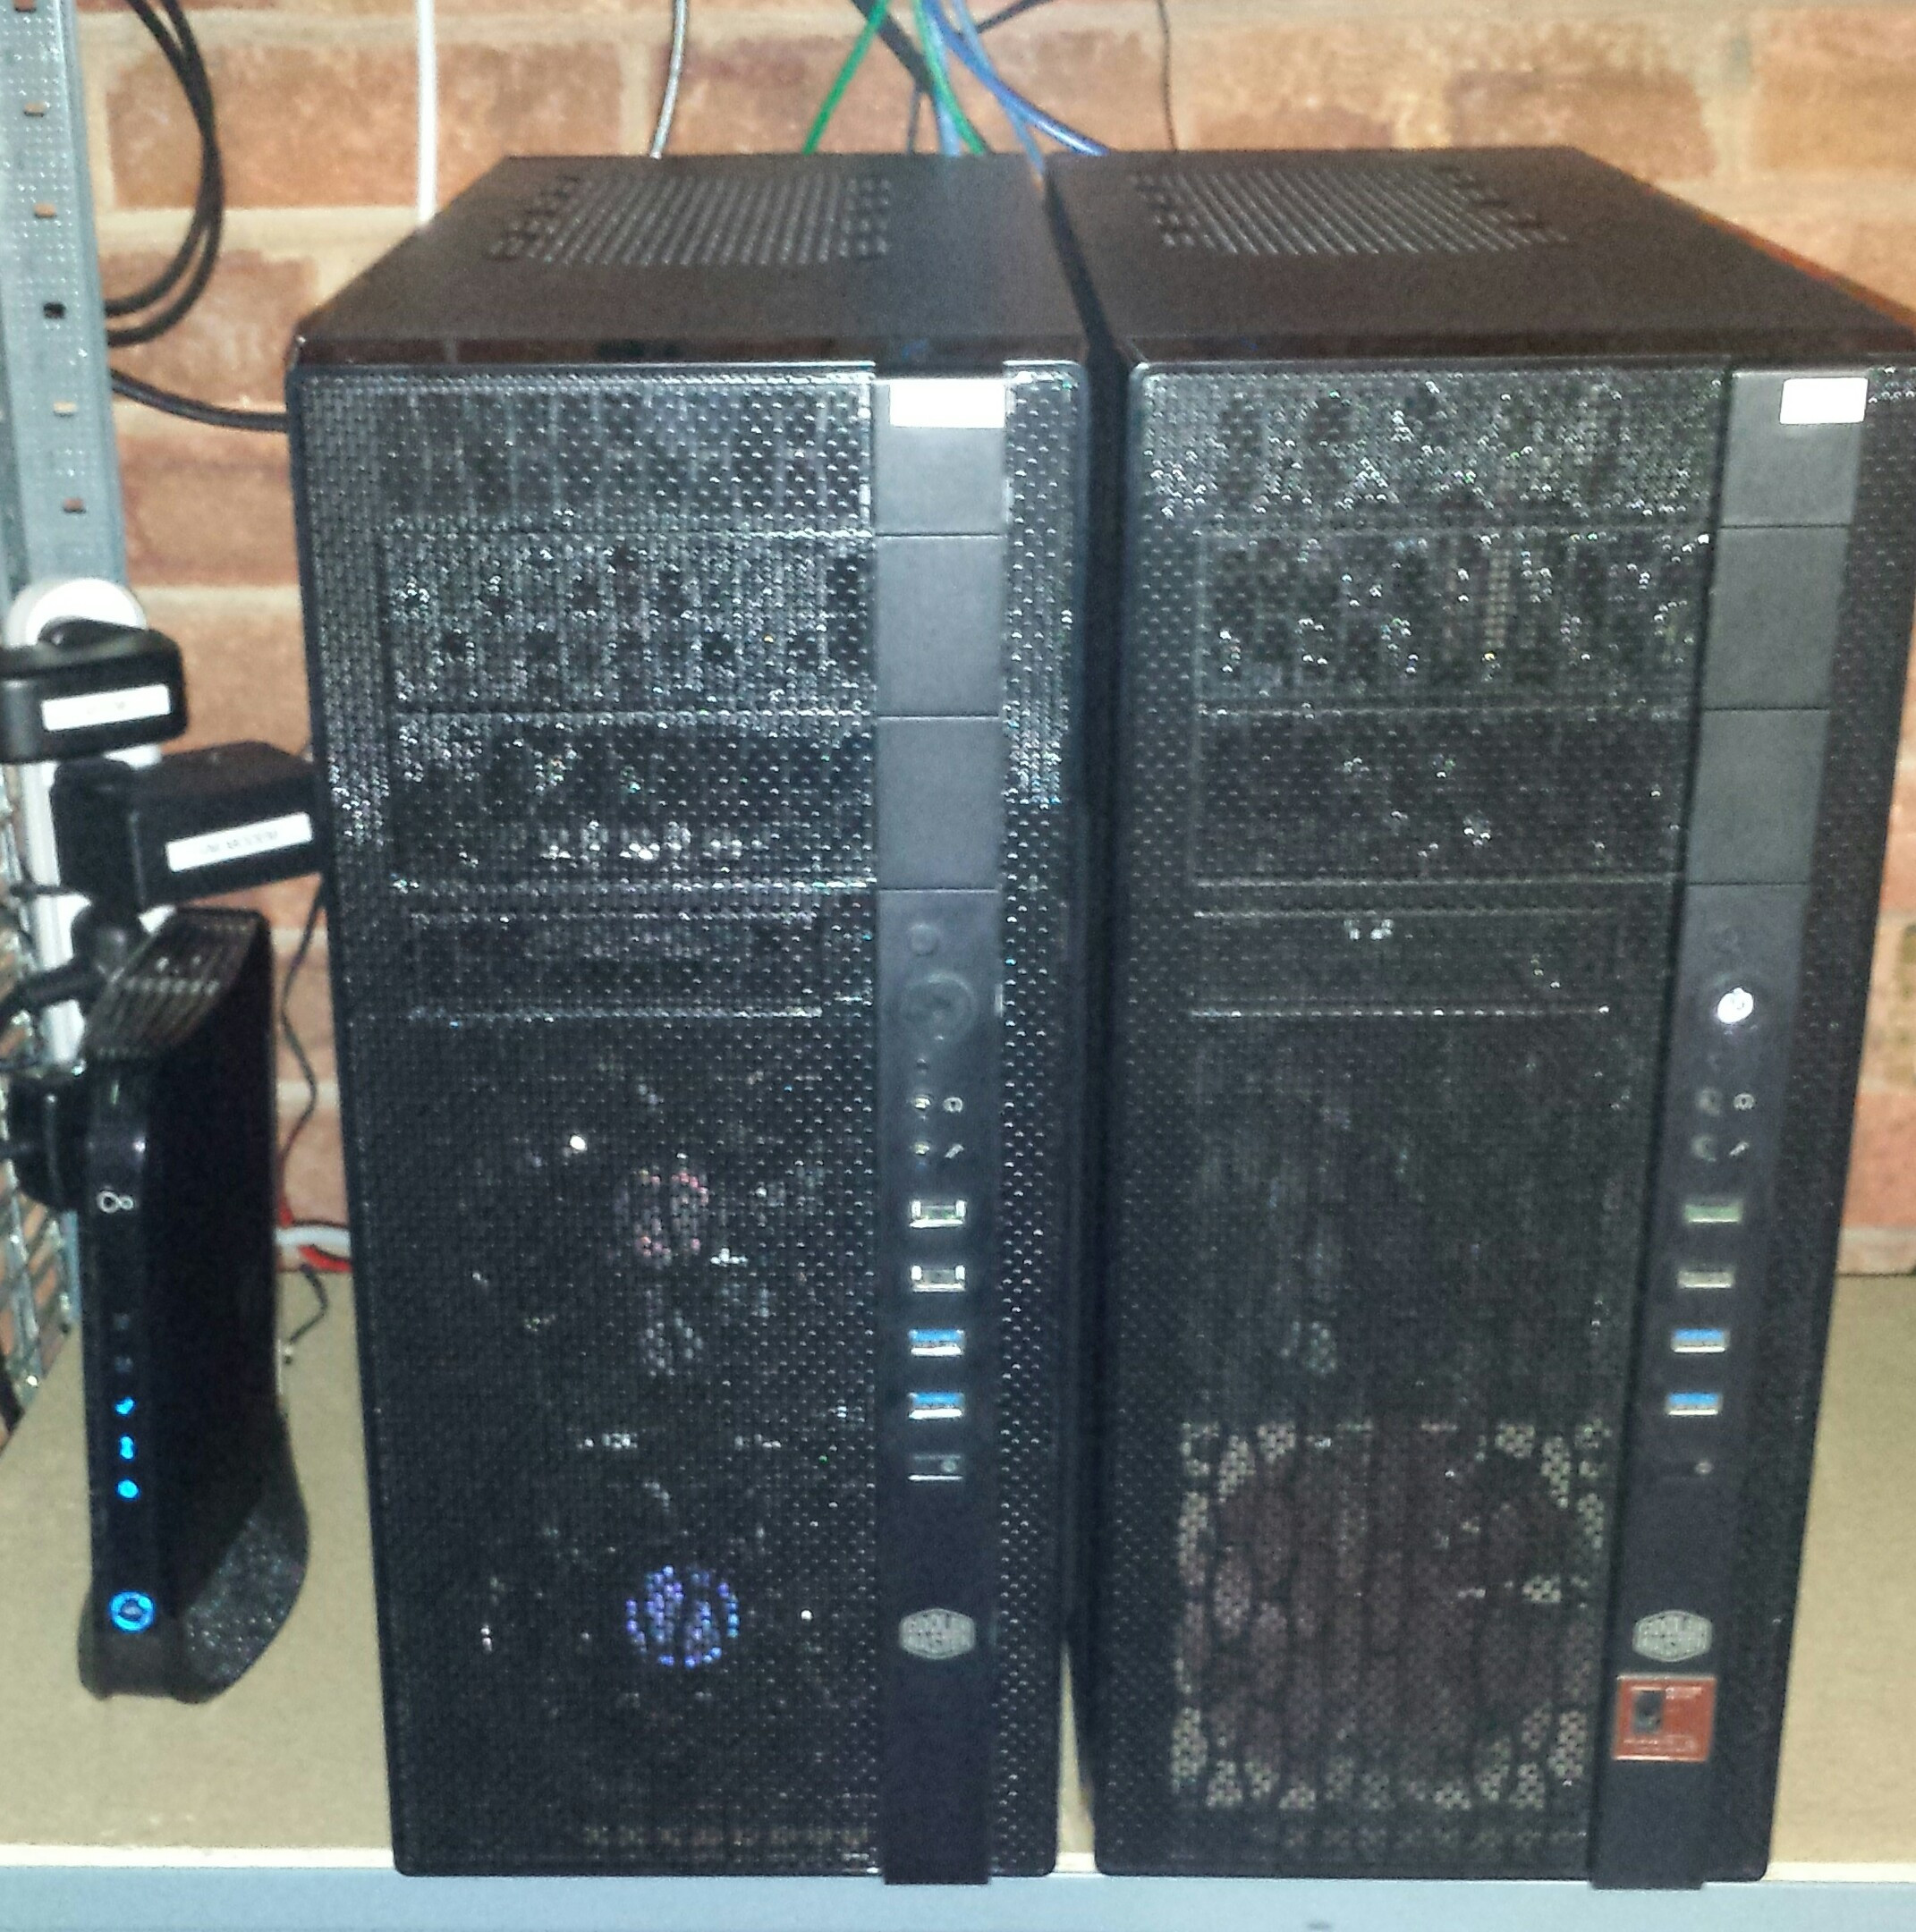
The “home server” (brox), is the one on the right that has Noctua fans. Affectionately named for a recumbent cargo bike. Most of that home server still survives - I will come back to that as we walk through how my home IT infrastructure looks today.
Home IT Infrastructure Goals
Whilst building out this network, I had aims to achieve as well as contraints to live within. In short:
- Safely store my data (several terrabytes of photographs).
- Within reason, be reliable. When I am dealing with an out-of-hours incident, my home network needs to not get in the way.
- Be cost effective. Both in terms of initial costs and ongoing expenditure (energy consumption).
- Provide a sandpit or lab environment I can experiment in without taking down the home network.
- Re-use old equipment as much as possible. E-waste is not good for anyone!
- Spouse approval!
Network Diagram (sprawl)
In producing a network diagram for this article, it dawned on me that I have created what looks like a sprawling mess! Hopefully appearances are deceiving, and as I go through this diagram, I’ll perhaps reveal some of my home infrastructure’s inner beauty.
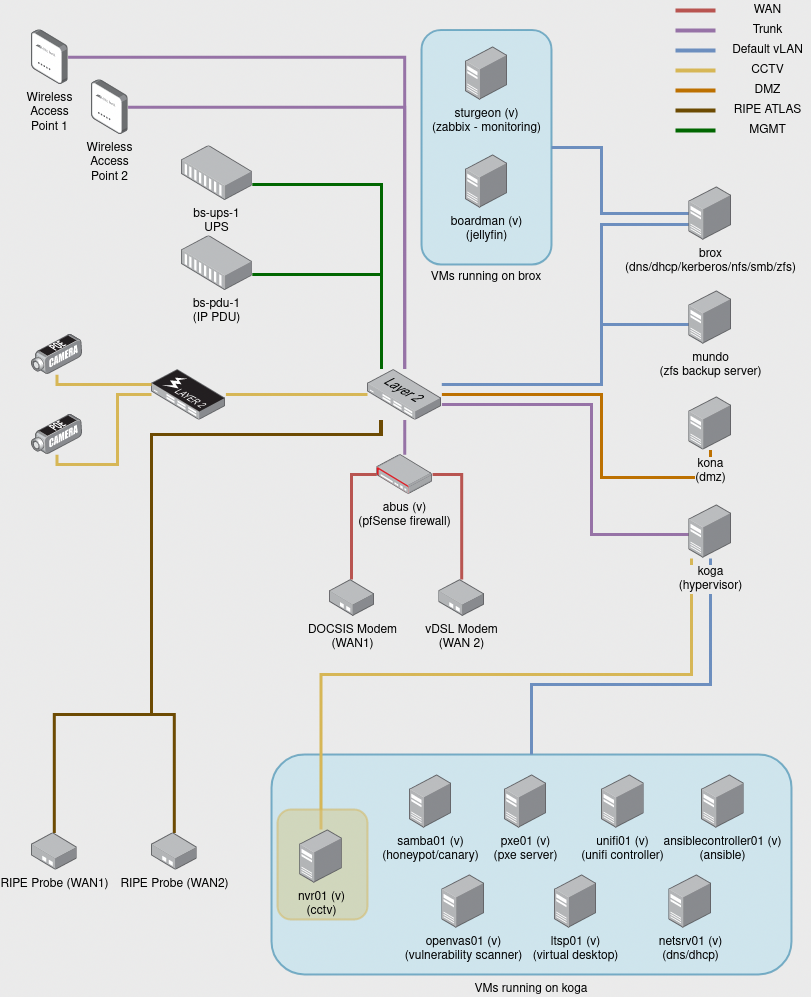
Multiple Networks
The diagram above really depicts multiple networks with traffic routed in between them (where permitted) by the firewall, abus.
These multiple networks have been implemented with 802.1Q vLANs. A potential topic for a future post? There are more vLANs than shown by the diagram, about 10 different vLANs in all.
vLANs are, in the most simple sense, an effective way of making a network switch behave like it is actually multiple switches.
When you start using multiple vLANs, networks start to get very complicated and this one is no exception. In a workplace or production environment there is generally a bit more cash to invest in networking equipment and even more emphasis on uptime and reliability. Professionally I am reluctant to use vLANs except when a situation demands it, i.e software defined networking etc..
vLANs Depicted on the Diagram
A summary of the VLANs included in the above diagram…
Default vLAN
This is the main “trusted” network, bikeshed.internal, to which most of the servers and most devices in the house are attached. Some hosts on this network have static IPv6 addresses, but in general, IPv6 router announcements and DHCPv6 are turned off.
CCTV vLAN
CCTV cameras are notoriously insecure and it is very easy to set them up and find you have inadvertently opened your home to the prying eyes of strangers. Setting up a dedicated vLAN with restricted Internet access seems like a very sensible move. The only host with limited Internet access on this network with access to the Internet is the Network Video Recorder, nvr01, for the purpose of pulling software updates.
The NVR software itself is also accessible from the Internet via an NGINX reverse proxy running on the DMZ server, kona. There is no direct access to the cameras from any other host on any of the networks, except when I temporarily add a firewall rule to permit requests to them.
DMZ vLAN
There are some services I want to make available to the Internet. These include Nextcloud and Jenkins, as well as websites and services I’m developing that I want to make available to other people. I host these on my DMZ server, kona. Hosts in the DMZ vLAN have no direct access to any of the other networks. SSH access to kona is restricted to hosts that have DHCP reservations or static IPs in given ranges, primarily for backup and administration purposes.
RIPE Atlas vLAN
RIPE Atlas is an Internet measurement network. I have one probe for each WAN connecton at home. This vLAN is IPv6 enabled, with Hurricane Electric GRE tunnels providing the WAN IPv6 connections. Neither of the ISPs I use provide native IPv6.
MGMT (or Management) vLAN
Most of the physical servers, save for kona have out-of-band management, which means I can remote console onto them. This is useful in situations like re-installing the operating system or diagnosing problems when a server is for some reason no longer accessible on the network. Only hosts in the default vLAN with static or reserved IP addresses in a given range have access to the management vLAN.
vLANs not depicted on the diagram
For simplicity, I’ve left a number of vLANs off the diagram. These include…
Guest WiFi
I use Unifi UAPs which support mutliple SSIDs and SSID to vLAN mapping. This means I run a separate Guest WiFi network segregated from the other networks, a boon for security. The UAPs are now end-of-life, but I have two brand new Unifi WiFi 6 Lite access points waiting to be installed. The old access points are currently plugged in with injectors providing 802.3at PoE. The new access points require 802.3af PoE and are not sold with PoE injectors.
I’m in the midst of properly structurally networking the house and adding a comms cupboard with a smart/managed PoE switch. Once that work is complete, the new access points will be adopted in lieu of the older UAPs.
I should note that I’m no longer in a position where I recommend Unifi equipment on account of their recent anti-consumer antics and security breaches.
Public WiFi
I provide an open WiFi network managed via a captive portal. It is heavily restricted in terms of both bandwidth and having a hard timeout. The outbound traffic is also round-robin routed via multiple privacy VPNs. I make this available so that my immediate neighbours can still get on-line if their Internet connection is subject to a fault. I have a look every now and then to see how actively used this service is and check that there is no excessive usage.
Lab1 (bikeshed.lab)
The first of two lab environments. The only host with a leg in this network, is the Proxmox PVE hypervisor, koga. This lab environment relies on the firewall for DHCP and DNS and I use it for spiking out software and running experiments that I want to keep separate from the main network.
Lab2 (independent.lab)
This lab environment is very much like the first one, except the firewall does not provide DHCP or DNS. I’ve used this in the past for bulding up Windows domains and trying out other firewall software etc..
Trunks
There are a couple of trunk links in the physical network topology. These are physical bits of cable that carry multiple vLANs, for instance between the firewall and the switch, between the switch and access points and also between the switch and the hypervisor, koga. Not all trunks carry all vLANs. Thy just carry more than one vLAN, so in the case of the two statically LAGged links between the switch and koga, they carry the CCTV vLAN for the NVR and the two lab vLANs. Other vLANs are excluded.
WAN
WAN links are separate networks in their own right, not vLANs. They are ethernet connectons between the firewall and the modems.
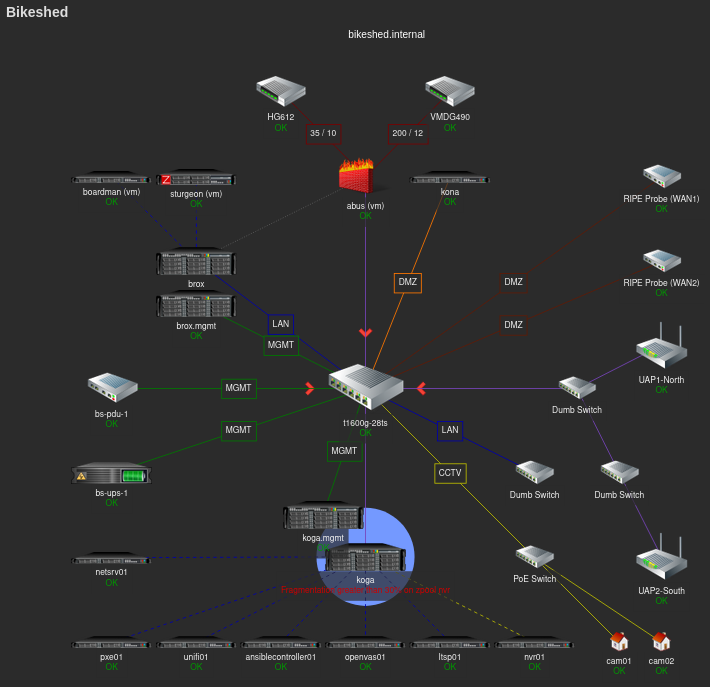
Network Hosts
There are a good number of hosts on the network and whilst some have obvious names, like ansiblecontroller01, others are treated like pets and have more names like koga or mundo. Yet others have names that are simply and deliberately misleading…
Physical Servers
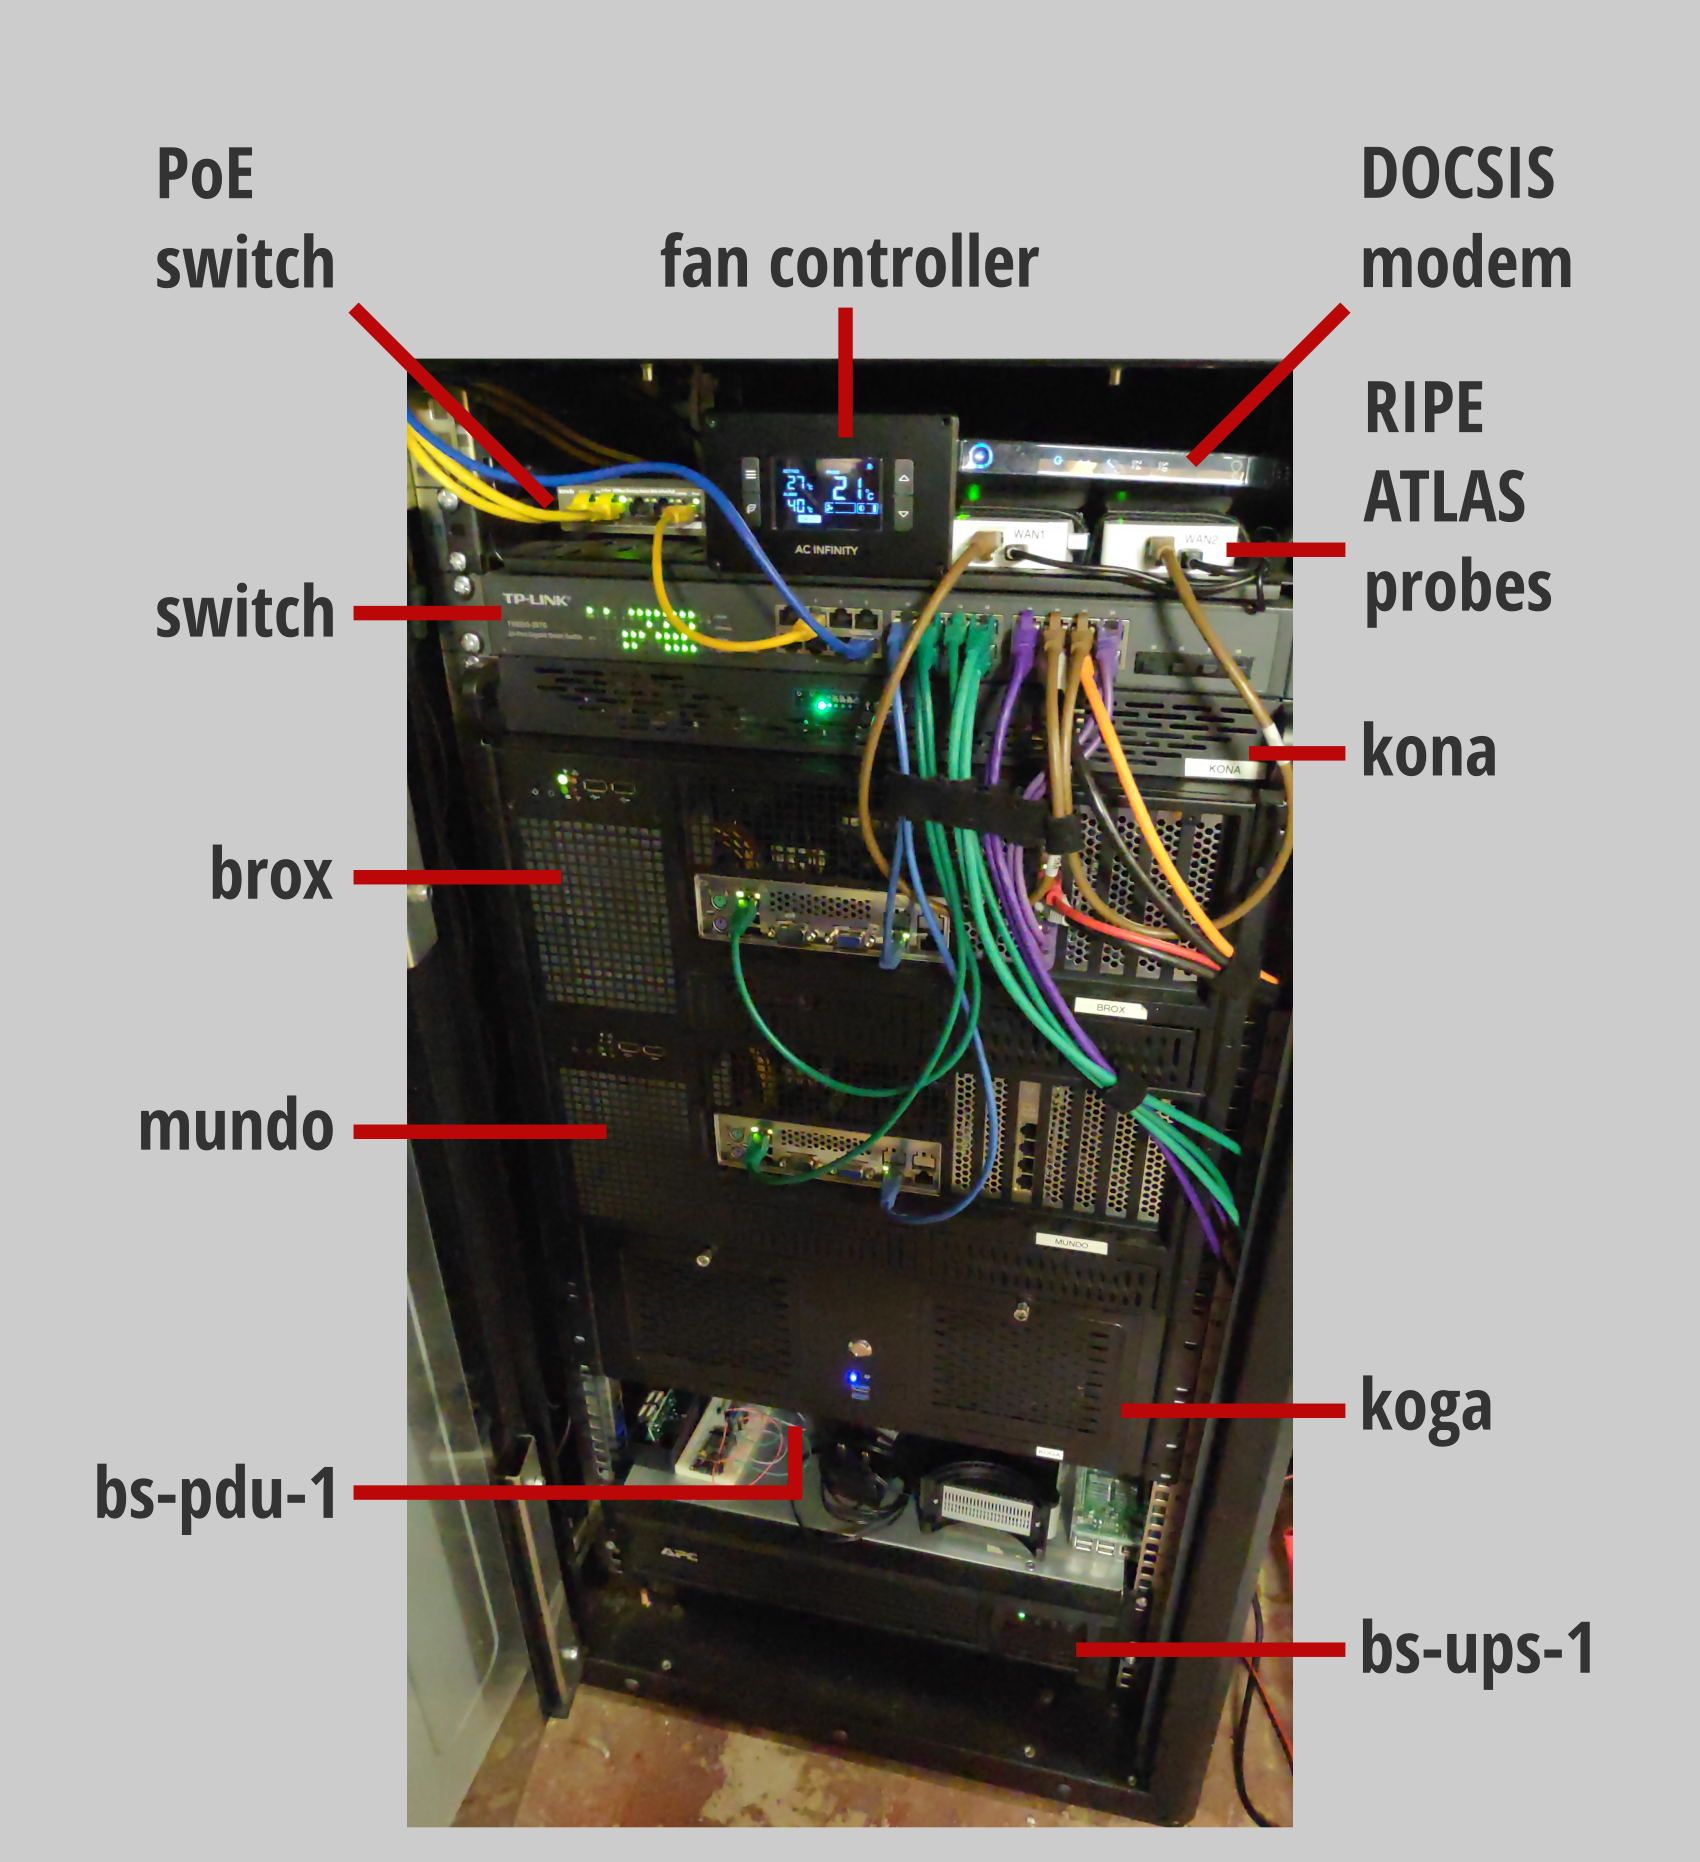
brox
This is one of the servers pictured above in the opening section of this posted. It is also posted in the picture of my rack that comes near the end. You may think that these are actually two servers with the same name. Aside from the case, PSU and disks, very little else has changed.
This server was built to be powerful enough to run a virtualised media server, transcoding full HD video yet also be extremely energy efficient.
In terms of specification, it runs with:
- Asus P8B-M Workstation motherboard
- Intel Xeon E3-1220L v2 CPU
- 24 GB DDR3L ECC RAM
- 2 x Samsung Evo 860 250GB SSD, mdadm RAID boot disks
- 2 x 4TB WD RED HDD (pictures and other important things stored here)
- 2 x 3TB Toshiba DT01ACA300 HDD (less important things stored here)
- Intel VT/1000 Pro quard port NIC
With some optimisation, the power consumption runs to about 25W under its usual workload.
The additional network card is PCI-passed-through to abus, the firewall.
In terms of software, the operating system is Debian. The two sets of hard disk drives are vdevs for two ZFS file systems. Virtualisation is provided via libvirt, QEMU and KVM. As well as storage, this server provides network services like DHCP (ISC DHCP Server) and DNS (Bind). File sharing is enabled via Samba and kerberised NFS. This machine also hosts some of my private Git repositories and orchestrates daily backups of data stored on the DMZ server and log archival from VPS servers.
This server also acts as a mail relay or smart mail host for the network, relaying email via an SASL authenticated connection to a VPS-hosted mail server. In an organisational setting, I am not a big fan of having servers that have multiple roles like this one. I would rather have smaller servers with smaller sets of responsibilities because that makes things easier to maintain. Alternative approaches may be using virtualisation for each and every role on a physical server and/or containerisation.
mundo
mundo is now almost physically identical to brox, save for the disk arrangement and only having 16GB of RAM. It still has the same pair of SSD boot disks, but bulk storage is provided by a selection of 4 x 2 TB hard disk drives. These are provisioned under ZFS as raidz2, which is broadly the equivalent of RAID-6.
mundo is switched off most of the time, but each night as part of a daily backup cycle, it is switched on via the IP-enabled power distribution unit (bs-pdu-1) and a fresh ZFS snapshot is shipped over from brox. The nightly scripts on brox also snapshot the firewall virtual machine and ship that over. In the event of a catastrophic event rendering brox unbootable, I can move a few network cables, turn Mundo on, start up the firewall VM and its pretty much business as usual.
This sort of luke-warm failover is fine for my purposes. If I was working away from home more than a couple of days in a year, then I would invest in a fully redundant setup with multiple switches and pfSense running fully redundantly with CARP. That would add significantly to my costs, as I would need a number of static public IPs and as well as the overhead of using more electricity by running another physical server 24 x 7. The compromise I’ve arrived at is not the always-on availability that the IT Infrastructure Engineer in me craves, but it is a fair compromise for a regular domestic situation.
kona
This is my DMZ server. It is a cheap commodity server with no server grade hardware at all. I set myself the challenge of building it for less than £200.
- ASRock J3455-ITX motherboad (Intel Celeron J3455 SoC)
- 8GB RAM
- 500GB SSD
- Clone PicoPSU
Power consumption for this machine was measured at 13W.
It runs Debian, Nextcloud, Git, dockerised Jenkins and Irssi.
koga
This is a Proxmox PVE hypervisor, hosting guests in the default, lab and CCTV networks.
- Asrock Rack D1541D4U-2T8R motherboad (Intel Xeon D-1541 SoC)
- 64GB DDR4 RAM
- 2 x 1TB Crucial SSD
Power consumption for this machine runs from 45W with its usual workload and increases to around 55-60W with occasional additional workloads.
Virtual Servers Running on brox
sturgeon
This host runs Zabbix (on top of Debian) which is used for monitoring the availability of hosts and services on the network.
If you are thinking of a Sturgeon as a type of fish, guess again. Still on the cycling theme, this host is named for Union Cycliste Internationale Commissaire Kevan Sturgeon.
boardman
This is a media server, which currently runs JellyFin as a transcoding media server.
abus
For now this is a pfSense firewall. It manages inter-vLAN routing, provides OpenVPN server end points, runs OpenVPN clients and finally runs the Snort intrusion prevention system.
Virtual Servers Running on koga
netsrv01
Provides redundancy for a number of network services in conjunction with brox. These include:
- NTP
- DHCP (active-active)
- DNS (BIND secondary server)
- Kerberos Key Distribution Centre (read only replica)
All of these services are of course hosted on Debian.
nvr01
This is the Network Video Recorder for the CCTV system. It runs Shinobi running on top of Debian.
samba01
This virtual machine is not what it appears. Rather than a Samba server, it is a canary or honeytrap. Any access to this host via SMB, SNMP or even HTTP etc. will generate a notification. It presents out over HTTP as something that looks like common garden variety NAS server. Take a look at Thinkst’s OpenCanary for more information.
openvas01
Another virtual server running Debian. And OpenVAS. OpenVAS is an open source Vulnerability Assessment Scanner. It is configured to run periodic scans of the network identifying hosts and vulnerabilities.
pxe01
A TFTP server that provides a preboot execuiton environment for booting machines from the network. This host runs HPA’s TFTP server. PXELINUX provides a boot menu, which can be used to either install operating systems, run DRBL, Slax or even memtest.
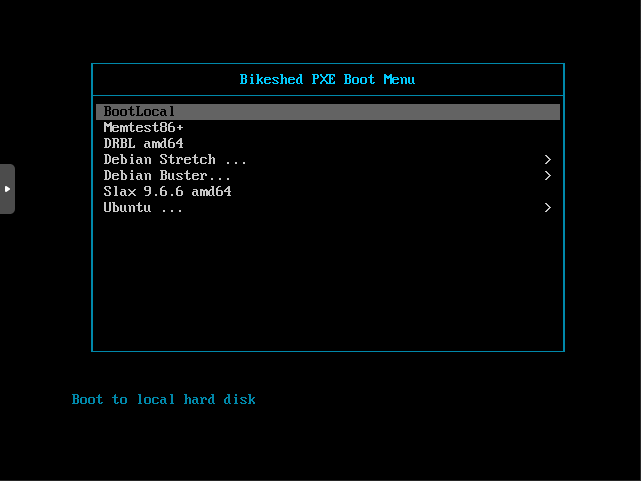
I use a preseed file with the Debian installer to minimise the amount of button pressing involved with a Debian install.
ansiblecontroller01
Another self-explanatory host. This is a Debian server with Ansible’s prerequisite packages installed. I generally keep my Ansible repository checked out on this host and use it to apply or push Ansible configurations to the hosts I manage. I have around 70-80% of my configuration in Ansible now - that has been where I have placed most my effort in improving the way my IT infrastructure is managed over the last two years. I even use Ansible to set up my Linux desktops and laptops.
unifi01
This is a Ubiquiti Unifi Controller which is used to manage the Unifi Access Points.
Other Equipment
Top-of-rack Switch
The top-of-rack switch is a basic smart/web managed switch. It is a TP-LINK T1600G-28TS (TL-SG2424) which gets the job done. LACP and STP in any flavour don’t work well together, so where I have LAGged connections, they are statically configured.
There are a couple of 5 port dumb switches plugged into this switch not depicted in the earlier network diagram. These will be disappearing soon when I complete the structured network I am in the midst of installing.
IP PDU
I was very fortunate in acquiring an APC AP7920 IP-enabled Power Distribution Unit. This means I have the means to remotely turn power sockets in the rack on and back off. This is how I manage the backup server, mundo which is only switched on for the backup window.
UPS
The energy efficiency of the hardware I’m using actually means that I am able to use a relatively small uninterruptable power supply for the equipment in my rack. I use an APC SMT750RMI2U which has a network management card.
The Rack Itself
The Rack or wreck as it is commonly known, is actually a 24U comms cabinet measuring just 600mm deep. This has posed quite some challenges in finding appropriate shallow depth server cases. In its defence, the wreck was found on Gumtree for £cheap and was just small enough to fit inside a MINI R55 Clubman.
One of the wreck’s other appealing factors is it being enclosed. This makes a degree of temperature regulation possible, especially in winter. During the pre-rack days when I had the servers on a shelf in the garage, I recorded hard disk drive temperatures in low single digits.
Future Plans
I am mostly content with where my home network is at. However, there are still a few boxes left to tick.
I am in the throes of installing a proper structured network. There is a “comms” cupboard which has been stripped bare, batoned and insulated. I have ‘machined’ chases into the walls around the house ready to route conduit and cables. There is a wall mountable 6U open frame rack, a number of patch panel and a distribution switch all waiting to be installed. This work will be complete by the end of the summer, if not early autumn (I have a lot of commitments) and will no doubt be followed by another write up here.
That aside, most of my emphasis will be around filling the Ansible gaps so every host has declarative configuration in source control.
I would also like to make a few more of the services on the network highly available, particularly the monitoring as that is the most important feature in any managed network environment.
My final wish; getting a little more use out of my lab in the near future experimenting with new technology.
Thank You
This article, by my own admission, is far far too long. I hope it inspires someone who is just getting involved or wanting to get involved with IT Infrastructure.
It is not a de facto way of doing things - if tomorrow I had to start again from scratch, I’m sure the end result would be very different.
Thank you for joining me. I hope you have enjoyed the tour.